All Categories
Featured
Table of Contents
- – Repair Rv Roof Leak Orange, CA
- – OCRV Center
- – Rv Rubber Roof Replacement Cost Orange, CA
- – Rv Roof Leak Repair Orange, CA
- – Replace Rv Roof Orange, CA
- – Rv Trailer Roof Repair Orange, CA
- – Rubber Roof For Camper Orange, CA
- – Rv Trailer Roof Repair Orange, CA
- – Rv Rubber Roof Maintenance Orange, CA
- – Rubber Roof Installation Orange, CA
- – Rv Roof Repair Near Me Orange, CA
- – Rv Roof Repair Near Me Orange, CA
- – Rv Roof Repair Fiberglass Orange, CA
- – Rubber Roof Installation Orange, CA
- – OCRV Center
Repair Rv Roof Leak Orange, CA
We checked the seals around every home window, door, trim and air vent to confirm that I didn't miss anything. (go examine it out, if you have not yet).

Use brand-new sealer. And now you're secured versus water damages for an additional year!
Long term exposure to rainfall, severe warm, freezing temperature levels, severe cleansing detergents, tree branches, and also oxidation can trigger roof covering seals to degrade, leading to water damages. If you're questioning exactly how to properly secure a recreational vehicle roof, this article will certainly stroll you via the needed actions. Utilize our suggestions to make sure the sealant application procedure provides long-term protection for years ahead.
Rv Rubber Roof Replacement Cost Orange, CA
Where the front cap meets the roofing system. Edges and corners of the roofing system's perimeter. The location around the AC unit(s) and skylight(s). The seals around components, like the roofing vent, refrigerator vent, satellite dishes, and antennas. Around any kind of various other accessories set up on the roofing system. Utilize these steps to tidy and reseal the roof covering of your leisure vehicle: Use the sealer on a cozy, completely dry day, preferably with temperatures in between 70 and 80 levels Fahrenheit.
Begin by sweeping the roofing and, gaps, and worn-out seals - Rv Roof Leak Repair Near Me Orange. Pay unique focus to areas around roof covering vents, skylights, corners, and sides.
Rv Roof Leak Repair Orange, CA
Rubber handwear covers. Ladder. Plastic putty blade to remove old sealer. The cleaner the area, the much better the sealant's call and adhesion. Beginning by sweeping the roof. Next, wet a towel with unsmelling mineral spirit to clean the dirty sealant. Wipe with a completely dry towel, concentrating on nooks and edges. If your motor home roof is incredibly unclean, and the sealant is undamaged, give it a good cleansing utilizing water, a soft bristle brush, and gentle soap.
But if the sealer has actually severely harmed areas, stay clear of utilizing water as it can penetrate the fractures. If the sealer is still pliable, soft, and very easy to press, you can use brand-new sealant straight on top. Nonetheless, if it is old, difficult, cracked, bumpy, or irregular, elimination is necessary for a proper seal.
Instead, make use of a putty knife or scuffing blade to delicately raise it. For persistent places, utilize a warm gun to soften it.
Replace Rv Roof Orange, CA
Pause until you are ready to apply. Holding the caulking weapon at a 45-degree angle, gradually run the nozzle along the outer side and afterwards the internal sides of the old sealer. Fill the area between the 2 lines of sealer with a moderate quantity of sealant, while guaranteeing it is uniformly dispersed.
The good news is that Dicor lap sealants function on any roof covering kind. Apply sealant in workable sections, regarding one to two feet at a time to prevent the sealant from creating a skim layer on top.
Bear in mind to wipe the end of your caulking weapon prior to beginning a brand-new area to avoid any accumulation that can influence the sealant's efficiency. The drying time can vary based on the sealer type and environmental conditions.
The very first step is to clean the existing sealant and areas around it utilizing mineral spirits or water. If the existing sealant is old and damaged, eliminate it and use EternaBond, and after that apply brand-new lap sealer around the edges of the EternaBond tape.
Rv Trailer Roof Repair Orange, CA
Cut the size you require for the area you're using, lay it down on the roof, and gradually peel the backing off. For even more tranquility of mind, use a little bead of lap sealer along the edge of EternaBond tape.
Below are some frequently asked inquiries about the Motor home roofing securing procedure. You should reseal your motorhome or trailer roofing system every 2 years, depending on your location's climate and roofing system material.
Rubber Roof For Camper Orange, CA
When the surface area is tidy from particles, you can wipe down the location with Acrysol body de-greaser or mineral spirits to clean the surface. Acrysol will remove any of the old dirt and oils from the roofing and sealer surface area. If there is anything loose, you will need to remove it before sealing.
When everything is safeguarded appropriately, after that you are ready to begin the resealing procedure. When you have the sealants cleansed to your preferred degree, you can then start the securing procedure. See to it that anything loose gets scuffed off Right here is a web link for Acrysol Scraper device blue CRL stick Tapered suggestion stick and handle The most effective caulking gun Dicor self-leveling lap sealant Make sure you have a look at Dustin's internet site, The golden state Recreational Vehicle Professionals, and their YouTube channel for more useful information, and see our published articles on and other social networks web pages. Thank you, Dustin.
Rv Trailer Roof Repair Orange, CA
The first step is picking the ideal sealant, which relies on the product of your motor home roof covering. Most modern RVs have actually roofs made from rubber, as this material is specifically resilient, however older lorries commonly have metal or fiberglass roofing systems. When picking a sealant, the initial point you require to do is ensure that it works with the material of your recreational vehicle roof.
The steps for these can differ based on your roof kind, so it is very important to understand the product your own is made of. When you know that, you can find out to execute an recreational vehicle roof repair work. If your rubber roofing system is flaking or looks milky, it possibly requires a brand-new layer of sealant.
Rv Rubber Roof Maintenance Orange, CA
Do not use a foam roller. Allow the sealer dry for 24 hr before traveling however recognize it's waterproof in as little as 3 hours. A fiberglass roofing system can be resealed with RV Roof covering Magic, similar to a rubber roofing system. The main difference is the preparation of the surface. Prior to you clean the roofing, scuff any kind of loosened, crinkled pieces of fiberglass finishing off.
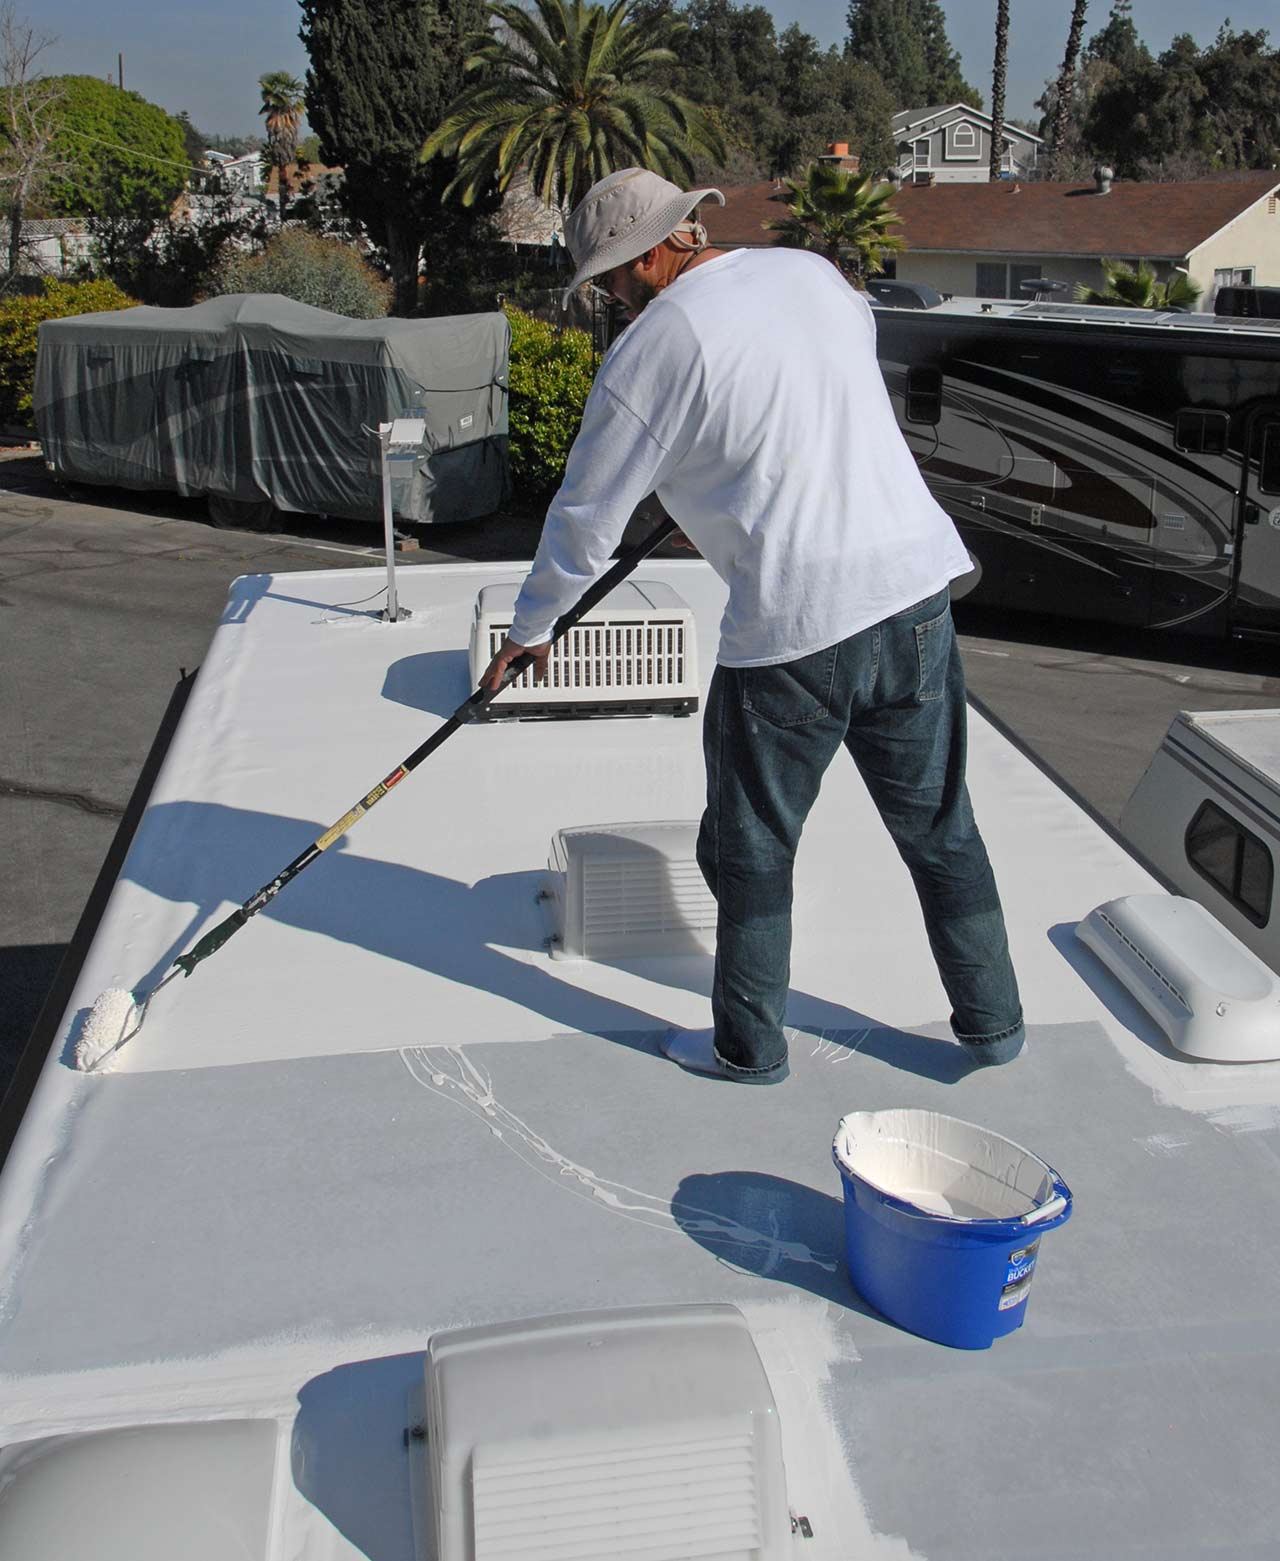
Tidy and wash the roofing system and enable it to dry entirely. After that, use the RV Roofing system Magic to the whole roof covering with a roller. RV Roofing system Magic can likewise be put on light weight aluminum and various other metal roofing systems. It is mildew-resistant and will certainly create a rubber-like layer in addition to the roofing system to offer rust protection.
One more essential part of Motor home roofing fixing is resealing joints. The steps for this are virtually the very same for all roof covering products when you make use of Butyl MS Caulk for the resealing.
The caulk will be healed in 24 hours and be totally cured in 7 to 2 week. If you locate a hole or tear in your RV roof, you'll require to fix it with Poly Material, Joint Tight, and Seam Tape, relying on the sort of tear. Seam tape can be applied by lining up both adjoining locations that require to be sealed and placing the tape on them.
Rubber Roof Installation Orange, CA
You can put it onto wet Seam Tight, which will certainly adhere and turn into one with the item. After that, you can apply motor home Roofing Magic over that area and the remainder of the roofing system to make sure the joint never ever comes apart once again. Recreational vehicle roofing system repair can be intimidating if you don't know where to begin.
It is a very easy and affordable task for any kind of Diy recreational vehicle owner. Here's what you need to recognize. Examine the seals and look for water damages prior to buying any recreational vehicle, even new ones. If you find inadequate seals, it might signify a possible water breach problem. As soon as you are positive that the RV is effectively sealed, then I would certainly advise reconsidering them a minimum of when a year.
This home window seal will let water enter Pay special attention to seams on the top and sides. They are a lot more at risk to wear and leak because they obtain the bulk of water overflow from the roof.:. Rusty screws that safeguard wall panels, lights, and other openings are a sign that wetness is behind the outer wall.
Pay extra attention to those areas. If your not exactly sure where those are, look for spotting along the sides. One locations often missed is beside the awning. Below's a Moving inside, water damages around home windows can create swelling, discoloration or possibly mold in the bordering wall paneling. Perform an aesthetic evaluation after that press the surface around the home window monitoring for softness.
Rv Roof Repair Near Me Orange, CA
Water dripping from the top of a window commonly diminishes the side of the window into the paneling around the lower corners. As soon as you've recognized what locations require to be resealed, comply with these steps to obtain a professional outcome. Utilize the pointy and flat end of a scraper to remove all existing sealant.
Mineral spirits can help loosen up recurring sealant after the very first scrape. Put some on a rag clean the around the area giving it a few minutes to do its magic prior to proceeding. Make use of a scraper to get rid of old sealant If you're stressed over scraping your paint task, after that I would certainly suggest using a plastic scraper.
Rv Roof Repair Near Me Orange, CA
Spray on some window cleaner and utilize a clean cloth or store towel to clean up the area. Tidy surface very well prior to applying brand-new sealant Dry the entire location with a towel before moving on. Rv Roof Leak Repair Near Me Orange.
It will be time consuming as opposed to simply free handing it. Depend on me, the extra initiative will certainly be worth it. Leave a small void of around 1/8 inch in between the home window framework and tape for sealer. Tape around window structure leaving 1/8 boundary for sealant What type of sealer to use? Everyone has their favored sealer for every kind of surface area and application.
I choose the clear 100% silicone sealant from my regional store due to the fact that it works excellent and comes in a capture tube. I prefer a clear silicon in a squeeze tube because it's easier to apply in little locations works excellent too and is a bit more costly. I do keep a number of tubes of ProFlex useful however largely use it in other locations.
Rv Roof Repair Fiberglass Orange, CA
This home window seal will allow water get in Pay unique interest to joints on the top and sides. They are a lot more susceptible to use and leakage considering that they get most of water drainage from the roof.:. Rusty screws that secure wall surface panels, lights, and other openings are a sign that moisture lags the outer wall surface.
Pay added interest to those places. If your not certain where those are, try to find streaking along the sides. One areas usually missed out on is beside the awning. Here's a Relocating within, water damages around windows can trigger swelling, staining or potentially mold in the surrounding wall paneling. Execute an aesthetic examination after that push the surface around the home window checking for gentleness.
Water dripping from the top of a window frequently runs down the side of the window into the paneling around the reduced corners. When you've recognized what locations need to be resealed, follow these actions to obtain a professional result. Utilize the pointy and level end of a scraper to eliminate all existing sealer.
Rubber Roof Installation Orange, CA
Mineral spirits can aid chill out residual sealer after the initial scrape. Pour some on a dustcloth clean the around the area providing it a couple of minutes to do its magic prior to proceeding. Utilize a scrape to get rid of old sealant If you're fretted about scratching your paint task, then I would certainly suggest using a plastic scraper.
An utility blade functions well for this. This step is vital to getting an appropriate seal. Spray on some home window cleaner and utilize a clean dustcloth or store towel to cleanse the location. The home window cleaner will certainly cleanse it up perfectly and vaporize quicker. Clean surface extremely well before applying brand-new sealer Dry the whole area with a towel before proceeding.
It will certainly be time consuming in contrast to simply cost-free handing it. Trust fund me, the additional initiative will certainly deserve it. Leave a tiny void of around 1/8 inch in between the home window frame and tape for sealant. Tape around window framework leaving 1/8 border for sealer What type of sealer to use? Everybody has their preferred sealer for every kind of surface and application.
OCRV Center
Address: 23281 La Palma Ave Yorba Linda, CA 92887Phone: (714) 909-1444
Email: [email protected]
OCRV Center
I like the clear 100% silicone sealer from my neighborhood store because it works terrific and can be found in a press tube. I favor a clear silicon in a press tube because it's less complicated to use in little areas works good too and is a bit a lot more expensive. I do keep a number of tubes of ProFlex useful however mainly utilize it in other locations.
Best Rv Roof Repair Orange, CARv Roof Replacement Orange, CA
Rubber Roof Installation Orange, CA
Epdm Rv Roof Repair Orange, CA
Rv Rubber Roof Replacement Orange, CA
Rubber Roof For Camper Orange, CA
Rubber Roof For Camper Orange, CA
Resealing Rv Roof Orange, CA
Epdm Rv Roof Repair Orange, CA
Rv Slide Out Roof Repair Orange, CA
Rv Roof Repair Orange, CA
Rv Roof Repair Service Near Me Orange, CA
Rv Roof Leak Repair Orange, CA
Rv Roof Repair Fiberglass Orange, CA
Rubber Roof For Camper Orange, CA
Best Rv Roof Repair Orange, CA
Rv Fiberglass Roof Repair Orange, CA
Rv Fiberglass Roof Repair Orange, CA
Rv Rubber Roof Replacement Cost Orange, CA
Rv Rubber Roof Replacement Cost Orange, CA
Rubber Roofing For Campers Orange, CA
Replace Rv Roof Orange, CA
Rv Slide Out Roof Repair Orange, CA
Rv Rubber Roof Maintenance Orange, CA
Rv Rubber Roof Repair Orange, CA
Epdm Rv Roof Repair Orange, CA
Class C Rv Roof Repair Orange, CA
Rv Roof Maintenance Orange, CA
Rubber Roofing For Rv Orange, CA
Rv Roof Leak Repair Near Me Orange, CA
Rv Roof Repair Orange, CA
Rv Slide Out Roof Repair Orange, CA
Rv Rubber Roof Repair Orange, CA
Rubber Roofing For Rv Orange, CA
Rv Roof Repair Fiberglass Orange, CA
Rv Roof Repair Fiberglass Orange, CA
Rubber Roof For Rv Orange, CA
Best Rv Roof Repair Orange, CA
Rv Rubber Roof Replacement Orange, CA
Motorhome Roof Replacement Orange, CA
Rv Roof Leak Repair Orange, CA
Best Rv Roof Repair Orange, CA
Class C Rv Roof Repair Orange, CA
Resealing Rv Roof Orange, CA
Motorhome Roof Replacement Orange, CA
Rv Rubber Roof Replacement Cost Orange, CA
Rv Roof Leak Repair Orange, CA
Rv Rubber Roof Repair Orange, CA
Rv Slide Out Roof Repair Orange, CA
Rubber Roof For Camper Orange, CA
Rubber Roof Installation Orange, CA
Rubber Roof For Camper Orange, CA
Repair Rv Roof Orange, CA
Rv Roof Replacement Orange, CA
Rv Roof Repair Near Me Orange, CA
Repair Rv Roof Leak Orange, CA
Rv Rubber Roof Replacement Orange, CA
Rv Rubber Roof Replacement Orange, CA
Rv Roof Repair Fiberglass Orange, CA
Rv Roof Leak Repair Orange, CA
Rv Rubber Roof Maintenance Orange, CA
Epdm Rv Roof Repair Orange, CA
Rv Rubber Roof Replacement Orange, CA
Rv Trailer Roof Repair Orange, CA
Rv Roof Repair Near Me Orange, CA
Rv Rubber Roof Replacement Orange, CA
Rubber Roof For Camper Orange, CA
Rubber Roof For Rv Orange, CA
Rubber Roof For Rv Orange, CA
Rv Roof Repair Near Me Orange, CA
Rubber Roofing For Rv Orange, CA
Class C Rv Roof Repair Orange, CA
Epdm Rv Roof Repair Orange, CA
Rv Trailer Rubber Roof Repair Orange, CA
Replace Rv Roof Orange, CA
Rv Rubber Roof Replacement Orange, CA
Repair Rv Roof Orange, CA
Rv Roof Maintenance Orange, CA
Find A Good Seo Services Near Me Orange, CA
Find A Good Local Seo Solutions Orange, CA
Rv Roof Leak Repair Near Me Orange, CA
OCRV Center
Table of Contents
- – Repair Rv Roof Leak Orange, CA
- – OCRV Center
- – Rv Rubber Roof Replacement Cost Orange, CA
- – Rv Roof Leak Repair Orange, CA
- – Replace Rv Roof Orange, CA
- – Rv Trailer Roof Repair Orange, CA
- – Rubber Roof For Camper Orange, CA
- – Rv Trailer Roof Repair Orange, CA
- – Rv Rubber Roof Maintenance Orange, CA
- – Rubber Roof Installation Orange, CA
- – Rv Roof Repair Near Me Orange, CA
- – Rv Roof Repair Near Me Orange, CA
- – Rv Roof Repair Fiberglass Orange, CA
- – Rubber Roof Installation Orange, CA
- – OCRV Center
Latest Posts
Newport Beach Planning Life Insurance
Payroll Service Provider Orange County
Contractor Payroll Services Laguna Beach
More
Latest Posts
Newport Beach Planning Life Insurance
Payroll Service Provider Orange County
Contractor Payroll Services Laguna Beach