All Categories
Featured
Table of Contents
- – Rubber Roofing For Rv West Covina, CA
- – OCRV Center
- – Rubber Roof For Camper West Covina, CA
- – Roof Repair For Rv West Covina, CA
- – Rubber Roofing For Rv West Covina, CA
- – Rv Roof Repair Fiberglass West Covina, CA
- – Rv Roof Replacement West Covina, CA
- – Rubber Roof For Rv West Covina, CA
- – Rv Roof Leak Repair Near Me West Covina, CA
- – Repair Rv Roof Leak West Covina, CA
- – Epdm Rv Roof Repair West Covina, CA
- – Roof Repair For Rv West Covina, CA
- – Rv Roof Leak Repair Near Me West Covina, CA
- – Class C Rv Roof Repair West Covina, CA
- – OCRV Center
Rubber Roofing For Rv West Covina, CA
I figured I would instead have it semi-portable so I went with the cover, plus this permits me to change the elevation up and down when I require to. Naturally the most inexpensive option of all would be to just throw a great tarp over the top of your motor home for stormy days and just service sunny days! Initially I raised the legs with 1 1/2 PVC pipeline that fit inside the legs and afterwards I affixed a hose pipe clamp around the PVC pipeline to hold up the canopy legs.
After that I sawed 1 1/4 square legs from 24's to put inside the cover legs (once more holding the cover up with pipe clamps.) and reinforcing the 4 corners with an extra 24 screwed to it. This is still a little saggy. I most likely should have handed over for some inflexible steel pipe from the begin.
Fractures in the EPDM roofing at side of camper (West Covina Rubber Roof Installation). An old spot job on the motor home rubber roofing system. Lots of caulk stacked over old trouble areas. As you can see, this roofing system has actually had a great deal of problems for many years. Looking from the within the camper there have plainly been leakages in numerous locations of the roof covering.
On the bottom is the original EPDM rubber roofing system layer. I recognize it's EPDM rubber and not TPO rubber because of the black backing. On top of my EPDM roof covering is a thin RV roof coating that was used later.
Rubber Roof For Camper West Covina, CA
I simply left the roof finishing stuck to the EPDM roofing and drew them up with each other. Starting to peel off roof covering coating.
All rubber roofing removed from camper. There was a glue under the lower layer of rubber that was still pretty well stuck in lots of locations, however with a great little bit of pressure it peeled off up cleanly.
If you assume you'll be saving the roofing decking plywood (not replacing it), after that you may save on your own some cleaning trouble by getting rid of the components initially and then peeling up the rubber! More water damaged areas on RV roof covering outdoor decking.
Roof Repair For Rv West Covina, CA
I went for the easiest one initially, an air vent cap from a kitchen area sink pipes vent pipe. There is no other means around this, you simply have to begin excavating till you reveal the screw heads.
Unscrewing the screws in air vent cap. The screws on this vent cap were hex-head metal screws so I made use of a small outlet driver to eliminate them.
I discovered an old wasp nest inside the air vent cover. This is a sight I'll possibly need to get utilized to, finding the remains of pet habitation in every nook and cranny. I spend an awful great deal of my time developing great wild animals environment in my lawn so I don't obtain upset when an animal selects to set up home in my recreational vehicle.
Rubber Roofing For Rv West Covina, CA
Thankfully no one was home in this old nest so I just threw it. You need to try not to damage these pieces (like air vent covers and caps) as you're scuffing off the old caulk and sealant simply in situation you need to utilize them again.
My roof vent additionally had an air vent cover over it. Beginning on the roof covering vent. Hardware subjected on roofing system air vent cap, the very first nut came off tidy.
The bolts on this Motor home roofing vent cover were nuts on tiny bolts. The second one simply began spinning, suggesting the screw was not repaired in location but transforming along with the nut. A peek at the hardware holding down the roof air vent cover.
Rv Roof Repair Fiberglass West Covina, CA
I really did not have any kind of excellent means to hold the bolt in position so rather I chose to saw through the bolts with a reciprocating saw. Sawing with screws on roofing system air vent cover. I made use of a cordless reciprocating saw with a metal-cutting blade however it was tricky to obtain the blade flat enough to get to the screws so near to the roofing deck.
Flexing the blade a little bit to get to close to the roof covering deck. Cover eliminated from roofing air vent.
I scraped extra caulk and roof sealant off the flange of the roof vent itself. I quickly found there were no extra screws or hardware holding it down so I provided up on the scratching and went inside the Motor home After scratching the caulk and sealer from flange of roofing system vent, no even more screws!
Rv Roof Replacement West Covina, CA
A pair sheared off with a great deal of pressure, but two wouldn't budge. So I needed to drill out the screw heads. I picked a drill little bit close to the size of the shaft of the screws that I had actually currently drawn out and began boring. Choosing a drill little bit for drilling out a screw head.
Rather of popping off the screw head, the plastic just melted away around the hot screw head. Hope I don't have to reuse this cover.
As soon as the brackets were out I went back up leading to pry out the the roof air vent. There are 2 cords running to the roofing system vent (a black hot wire and a white neutral cord) that you'll require to clip to remove the old vent (West Covina Rubber Roof Installation).
Rubber Roof For Rv West Covina, CA
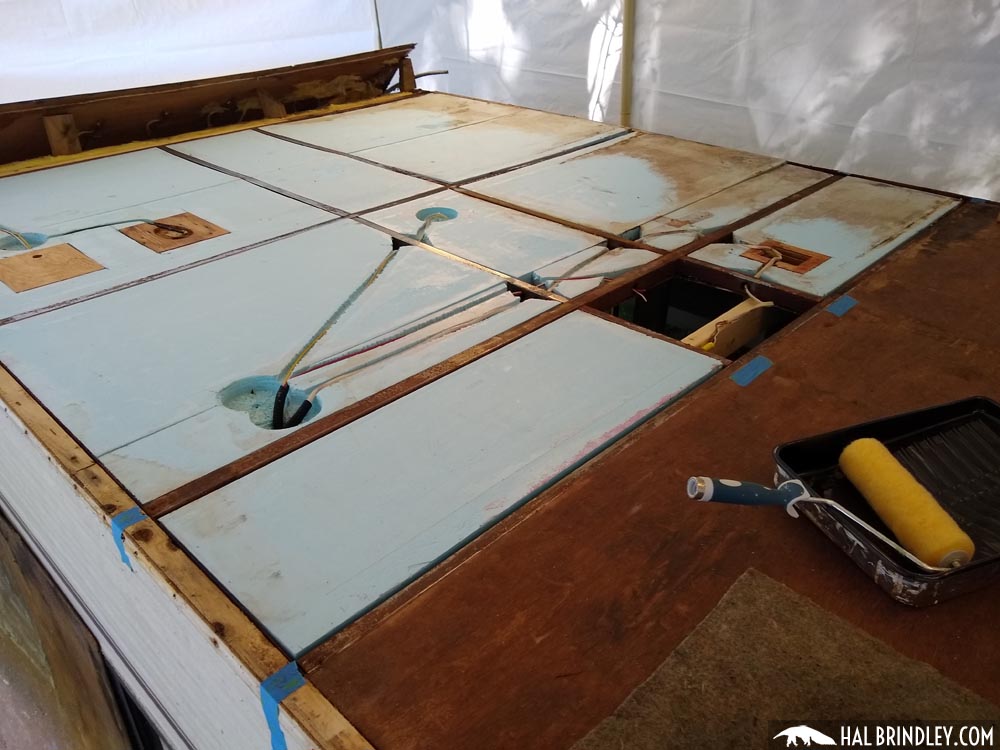
These are the cords attaching the roofing system venting follower. I clipped them simply above heaven splice joints. Roofing air vent removed and cleaned up. After clipping the wire and eliminating the vent, I tidied up any kind of staying goop and got my very first great take a look at the roofing system frame. It's metal! 1 1/2 inches thick.
Some RV roofs are mounted with timber, others have metal framing. I scuffed off some corrosion and made a big mess inside the shower room.
Oops. Perhaps I must have placed a tarpaulin down initially. My final objective of the day was to get the refrigerator air vent cover off. I observed motor home sealant balls at four points on the cover so assumed there need to be screws under them. I pried them up and located Phillips screw heads.
Revealing the screws in the refrigerator vent cap. Peeling off old RV roofing system covering in addition to refrigerator vent cap I also discovered that there was a layer of motor home roofing system layer over the air vent cap. These coverings are repainted on with a brush so clearly whoever did this finishing simply blobbed know top of every little thing.
Rv Roof Leak Repair Near Me West Covina, CA
Lifting off the cover of the fridge roofing system air vent. Reducing away extra rubber and scratching off Motor home roofing system sealant and old caulk. Scratching lap sealer and caulk from screw heads.
Some screws will be also rusted and require pliers to eliminate. Tearing off the refrigerator roofing system vent besides screws are eliminated. (and the devices utilized.) Virtually every screw remained in excellent enough problem to get rid of with an outlet driver, yet a couple were also corroded and required to be twisted out with vice grasp pliers.
Repair Rv Roof Leak West Covina, CA
I peeled the continuing to be rubber roof covering from under the flange and after that removed the old putty beneath. I'll cleanse it much better if and when I make a decision to reuse it. Feels like it's in decent shape so I probably will. Scraping off the old putty from the flange of the refrigerator roofing vent.
That's as much as I got on day 1 after about 5 hours of lazy job. Over time, your Motor home's roofing can come to be used, damaged, or create leakages, which can endanger its integrity and lead to more substantial issues. If you're experiencing any of these issues, it might be time to take into consideration replacing your Motor home roofing system.
There are several indications that indicate your RV requires a roofing replacement. These indicators include water leakages, sagging or soft spots on the roofing system, fractures or divides in the roofing material, excessive deterioration, and noticeable sunlight coming with the roofing system. If you discover any one of these signs, it is vital to resolve them immediately to avoid more damages to your motor home.
Epdm Rv Roof Repair West Covina, CA
On standard, Motor home roof covering substitute expenses can vary from $2,000 to $10,000. When choosing a RV roofing system material, a number of variables come into play.
Determining in between a diy (DO IT YOURSELF) strategy or professional setup for your motor home roof covering replacement depends on your abilities, experience, and offered time. While do it yourself installment can conserve you cash, it requires sufficient understanding and experience to make certain a correct and watertight installation. On the other hand, expert installment offers the benefit of experience, experience, and warranties.
Check and clean the seamless gutters and downspouts to make certain appropriate water drainage and avoid water merging on the roofing system. Use a safety covering or sealer to the roofing system surface as recommended by the manufacturer. This can supply extra UV defense and aid prolong the life of the roofing system. Stay clear of walking on the roofing unless necessary.
The cost of installing a recreational vehicle roofing can vary based on elements like RV size, selected roofing product, and whether expert installation is requested. Typically, you can expect to spend in between $2,000 and $10,000 for a motor home roofing system replacement. Yes, the roof covering of a recreational vehicle can be changed. If your RV's roof covering is damaged, broken, or dripping, a roof substitute is usually necessary to make sure the architectural stability of your RV.
Roof Repair For Rv West Covina, CA
Fixing a slit in a RV roofing depends on the severity and type of roof product. For minor rips, you can make use of roof covering fixing tape or sealant particularly designed for Motor home roof coverings.
Purchasing a high-grade RV roofing coating can be worth it for long-lasting roof maintenance. Flex Seal products are often used as temporary or quick-fix services for little leakages or cracks. While they might supply a short-term option, it's suggested to seek advice from a specialist and utilize correct RV roofing system repair work materials for a much more permanent and reputable repair.
Rv Roof Leak Repair Near Me West Covina, CA
PVC roof coverings offer outstanding durability, resistance to UV rays, and reduced maintenance requirements. They are thought about a reliable alternative for Recreational vehicle roof coverings, but the ideal selection depends on your details requirements and preferences.

Resealing your RV roofing ought to be done frequently to preserve its stability and prevent leaks. As a general standard, it's suggested to reseal your motor home roofing at least when a year or according to the supplier's referrals. Whether to leave your motor home slides in or out relies on the scenario and individual choice.
Consider elements such as safety, weather, and comfort when deciding. Motor home roofing leaks are reasonably typical due to different variables such as age, wear and tear, improper maintenance, or serious climate condition. Regular evaluations and positive upkeep can help minimize the occurrence of leaks. The decision to amount to a recreational vehicle due to water damages relies on the degree of the damage and the insurance company's analysis.
Class C Rv Roof Repair West Covina, CA
Insurance insurance coverage for motor home delamination depends on the certain plan and the root cause of delamination. It is very important to evaluate your insurance coverage policy and consult with your company to understand the coverage for delamination and any type of appropriate deductibles. Asserting water damage on a camper relies on your insurance coverage and the situations bordering the water damages.
Rubber Roofing For Rv West Covina, CARubber Roof For Rv West Covina, CA
Roof Repair For Rv West Covina, CA
Replace Rv Roof West Covina, CA
Epdm Rv Roof Repair West Covina, CA
Repair Rv Roof Leak West Covina, CA
Rv Roof Repair West Covina, CA
Rv Roof Replacement West Covina, CA
Rv Roof Repair Fiberglass West Covina, CA
Rv Slide Out Roof Repair West Covina, CA
Rubber Roof For Camper West Covina, CA
Rv Roof Maintenance West Covina, CA
Rubber Roofing For Rv West Covina, CA
Rubber Roofing For Campers West Covina, CA
Motorhome Roof Replacement West Covina, CA
Rv Roof Repair West Covina, CA
Repair Rv Roof West Covina, CA
Rv Roof Leak Repair Near Me West Covina, CA
Rubber Roof For Camper West Covina, CA
Best Rv Roof Repair West Covina, CA
Rv Roof Leak Repair Near Me West Covina, CA
Rv Fiberglass Roof Repair West Covina, CA
Rv Roof Leak Repair Near Me West Covina, CA
Epdm Rv Roof Repair West Covina, CA
Rubber Roofing For Rv West Covina, CA
Rv Rubber Roof Repair West Covina, CA
Rv Rubber Roof Repair West Covina, CA
Rv Roof Repair Near Me West Covina, CA
Rv Roof Repair Near Me West Covina, CA
Rv Rubber Roof Maintenance West Covina, CA
Rv Rubber Roof Replacement Cost West Covina, CA
Class C Rv Roof Repair West Covina, CA
Rubber Roof For Camper West Covina, CA
Rv Roof Repair Fiberglass West Covina, CA
Class C Rv Roof Repair West Covina, CA
Rv Fiberglass Roof Repair West Covina, CA
Rv Fiberglass Roof Repair West Covina, CA
Rv Roof Leak Repair West Covina, CA
Resealing Rv Roof West Covina, CA
Rv Rubber Roof Replacement Cost West Covina, CA
Rv Rubber Roof Maintenance West Covina, CA
Rv Trailer Roof Repair West Covina, CA
Rubber Roof For Rv West Covina, CA
Rv Roof Leak Repair Near Me West Covina, CA
Rubber Roof Installation West Covina, CA
Rv Roof Replacement West Covina, CA
Rv Roof Leak Repair Near Me West Covina, CA
Rv Roof Repair Near Me West Covina, CA
Motorhome Roof Replacement West Covina, CA
Repair Rv Roof Leak West Covina, CA
Rv Slide Out Roof Repair West Covina, CA
Motorhome Roof Replacement West Covina, CA
Repair Rv Roof West Covina, CA
Rv Fiberglass Roof Repair West Covina, CA
Roof Repair For Rv West Covina, CA
Epdm Rv Roof Repair West Covina, CA
Best Rv Roof Repair West Covina, CA
Rv Trailer Rubber Roof Repair West Covina, CA
Rubber Roof For Camper West Covina, CA
Rv Slide Out Roof Repair West Covina, CA
Epdm Rv Roof Repair West Covina, CA
Rv Rubber Roof Maintenance West Covina, CA
Roof Repair For Rv West Covina, CA
Rv Roof Maintenance West Covina, CA
Best Rv Roof Repair West Covina, CA
Rv Rubber Roof Maintenance West Covina, CA
Rv Rubber Roof Maintenance West Covina, CA
Rv Roof Leak Repair West Covina, CA
Rv Rubber Roof Repair West Covina, CA
Rv Roof Repair Near Me West Covina, CA
Roof Repair For Rv West Covina, CA
Roof Repair For Rv West Covina, CA
Rubber Roof For Rv West Covina, CA
Rv Rubber Roof Replacement West Covina, CA
Replace Rv Roof West Covina, CA
Replace Rv Roof West Covina, CA
Epdm Rv Roof Repair West Covina, CA
Repair Rv Roof West Covina, CA
Find A Seo Pricing West Covina, CA
Finding A Seo Solutions West Covina, CA
OCRV Center
Table of Contents
- – Rubber Roofing For Rv West Covina, CA
- – OCRV Center
- – Rubber Roof For Camper West Covina, CA
- – Roof Repair For Rv West Covina, CA
- – Rubber Roofing For Rv West Covina, CA
- – Rv Roof Repair Fiberglass West Covina, CA
- – Rv Roof Replacement West Covina, CA
- – Rubber Roof For Rv West Covina, CA
- – Rv Roof Leak Repair Near Me West Covina, CA
- – Repair Rv Roof Leak West Covina, CA
- – Epdm Rv Roof Repair West Covina, CA
- – Roof Repair For Rv West Covina, CA
- – Rv Roof Leak Repair Near Me West Covina, CA
- – Class C Rv Roof Repair West Covina, CA
- – OCRV Center
Latest Posts
Lake Forest Local Payroll Services
Senior Citizens Insurance Villa Park
Final Expense Insurance For Seniors Aliso Viejo
More
Latest Posts
Lake Forest Local Payroll Services
Senior Citizens Insurance Villa Park
Final Expense Insurance For Seniors Aliso Viejo